How to Assemble the Computer Yourself Correctly, assemble the components or computer hardware so that it becomes a personal computer or a PC that can be operated as its function is not easy to understand how to assemble her, but not too difficult to learn how to assemble your own computer.
We assume You already know the components contained in a computer, if not understand or do not understand about the components of a computer, should learn first what are the components of a personal computer or pc.
We hope, after reading this article You can practice it later with the means as well as the steps to assemble a computer that is true with a guide to assemble the
computer as well as step by step assemble the computer.
How to Assemble your Own Computer with the Right
Here is a step or how to assemble a computer with the correct complete
1. Let stand components diperangkat computer hardware and equipment needed.
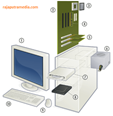
Components atauperkat hard, among other Casing, Motherboard, Proccessor (CPU) Attack and the fan / fun,memory / RAM, hard drive, CD / DVD Drive, Monitor, mouse. While the tool or tools needed setidakhnya andda have a screwdriver (screwdriver) and tang.
2. Attach the proccessor to the motherboard.
Generally when we buy proccessor already include with pasta proccessor, heatsink and fan, or familiar called CPU Cooler / fun proccessor. So between the proccessor, pasta proccessor, heatsink, fan/fun is the one package. Then how to assemble / install it?
First, open the socket the cpu is contained on the motherboard, attach the proccessor in such a socket. As the picture how to install the cpu following
First, open the socket the cpu is contained on the motherboard, attach the proccessor in such a socket.
Things that must be considered in the installation of proccessor into the socket on the motherboard is its position. How such a position? Proccessor and socket proccessor in the motherbord is generally characterized by a sign or marking-shaped right-angled triangle. A sign or marking is the same-the same in one corner of the proccessor and one corner of the socket proccessor. Way of installation is the sign or marking must meet each other, then close the lid and lock the socket by pressing the lever there. Make sure proccessor is completely installed according to the guidelines and the lever on the socket is locked firmly.
Second, apply the paste proccessor, attach the heatsink and fun proccessor in a row right above the proccessor that has been installed on the motherboard.
3. Pairs memory / RAM to the motherboard.
Note the picture of how to assemble the computer on the steps to install the memory above, the memory is installed in a slot on the motherboard. For the motherboard type terbaru generally, there are 2 (two) slot that is called by the DIMM (Dual Inline Memory Module). Plug the memory into one of the slots, press both sides, make sure it is completely locked with the strong.
4. Attach the motherboard to the casing.
Things that must be considered before installing the motherboard into the casing is to install the protective plate socket and protector of the motherboard connector. His way, escape/exhaust plate rear part of the casing is then replaced with the attaching plate congenital motherboard to the casing. Protective plate that we get when buying the motherboard (one package with the motherboard).
Next attach the screw pin (usually colored brass) to the casing as based/base to put the motherborad (pairs according to the number of screw holes that are on the motherboard), then put the motherboard right on it, fasten it with the screw that is available.
5. Plug the hard drive into the casing.
Before installing the hard drive, the thing to do is know the type of hard drive that will be used. hard disk are often used today is hard drive ATA and SATA. If using a hard drive ATA cable connector (interface) from the hard drive to the motherboard that should be used is the IDE cable, but if using the hard drive SATA cable used is a SATA cable. The difference of the IDE cable and SATA located on the physical, cable ATA wider than the SATA cable.
Then how to assemble / how to install the hard drive?
First, put the hard drive on the casing section that has been provided, then tighten with a screw on each side.
Second, attach one end of the data cable (data interface) to the hard drive and the other end to the motherboard. Model data cable connector is uniquely designed so that the small possibility of error, so the model either port on the hard drive or the motherboard is also designed uniquely.
Third, plug the power cord (connecting the source of power) from the power supply to the hard drive on the part that has been provided. The connectors and ports are also uniquely designed, so just make sure it’s installed correctly.
6. Attach the CD/DVD Drive into the casing.
Basically the CD/DVD Drive has a function that is almost the same with the hard drive that is as a storage unit, so also with the way of working and models of the interface. So how installation is almost the same, differing only on how its placement in the casing
7. Plug the power cord in the casing to the motherboard.
Installation of this cable must be true, by the way carefully, if an error occurs then it can have serious repercussions on the computer. Therefore, take a good look at the connector on the cable and port on the motherboard, the connector and the port has been designed in such a unique, on-board motherboard there are also instructions in the form of numbers, codes, and writing. So, pay attention to the model port and connector, as well as the instructions available on the motherboard.
8. Connect the device’s input-output to the computer.
That including I/O devices keyboard is, the mouse as an input device and monitor the output as. The Keyboard To the mouse, able’re connected directly by way of installing this connector (type PS2 or USB) keomputer. To monitor tertapat 2 (two) wires that power cable and data cable. Hubungakan power cable from the monitor To a power source, then connect both the data cable connector on the monitor and the commuter (port COM1).
The need for digital IT is needed in daily activities, Bead IT Consultant is the right choice as your partner, visit our website by clicking this link: www.beadgroup.com.