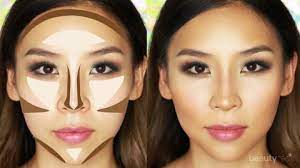
Shading is a dark shadow that is on certain parts of the face to cover flaws. In the world of makeup, this technique is part of contouring. This makeup trick is useful for shaping parts of the face or disguise parts of the face that look chubby. So that the face looks more symmetrical and perfect. Still not an expert in shading techniques? Come on, see the following steps!
Step 1 Face Shading
The first step of the face shading technique is to apply a light color foundation, you can choose one level from your skin tone. How to apply it in the middle of the forehead and the inner cheeks. For maximum results, you can use concealer. Next, apply foundation that is twice as dark in color or you can use contour cream on the top center of the forehead, and the top left and right. The method is the same as using a facial contour. Apply on both sides of the outermost cheek, and the outermost bone. Blend the cheeks inward and the forehead outwards.
Step 2 Shading the Nose
You also use dark foundation on both sides of the nose and light foundation on the bridge of the nose. How to apply from top to bottom like a straight line. Tips for shading the nose, namely the tip of the nose can be shaped like the letter U with dark foundation. The goal is to make it look sharper. After you have applied everything, just spread it wide, both dark and light foundation. Flatten it with your fingers first to make it easier to shape according to the facial bones. Next to tidy it up you can use a shading brush until it’s blended perfectly. Also make sure that the result is smooth and even.
Step 3 Shading the Chin
If you feel your chin is not thin, then you can also do shading in that area. The trick is to use your dark foundation to line on the right and left of the chin and then blend it towards the neck. How to make highlight makeup for the chin is to apply a light foundation or concealer in the middle of the chin. Then with a blending brush, you blend the two until they look natural. Should not be in a hurry so that the results are not messy. After everything is neat and even, you can set it again using loose powder so that it lasts longer.
Step 4 Finishing
JIf you are still unsure about the resistance of the shading that you have made, you can add a setting spray all over your face. The use of setting spray should be 20-30 cm from the face. Make sure all parts of the face are sprayed so that your makeup does not fade quickly.
How to Apply Shading to Different Face Shapes
- Round face
Don’t know if your face is round or not? Here are the characteristics: the width and length of your face are almost the same, the distance between the hairline hairline (forehead and ears) is close to the jaw, and the jawbone is usually quite wide. How to use shading for a round face is to brush on the right and left sides of the forehead to narrows the forehead area. If your forehead is very wide or forward, apply some more shading to the top of the forehead (hairline area). After that, brush the shading on your cheekbones, starting near the ears, then working your way up and down to the outer edges of your lips. Meet your shading on the chin area. Don’t forget to shade your nose too! Don’t forget to shade your jawline too if you don’t wear a hijab. If you use a hijab, that part does not need to be shaded because it will be covered by a veil. Don’t forget the highlights! It’s not uncommon for people to focus on shading so they forget about highlights. If shading is to give the outline a darker color, highlighting is the opposite.
- Diamond face
Tips on how to use the next shading are intended for the owner of a diamond face. The face of a diamond can be recognized by its shape and size which is like a rhombus. So, on average, the owner of a diamond face has a sharp chin and a fairly wide forehead (not narrow/the distance between the hairline and the eyes is quite far). Diamond face jaw shape is also usually not too wide. For how to use a diamond face shape shading, it is needed in the upper, right and left hairline areas of the forehead, but not too thick. Then, add shading under the cheekbones, just a little not too long. For the chin, you just need a little shading at the ends. Do not forget the nose area according to the shape of your nose. Then you can see in the picture, white for highlights and pink for blush
- Oval Face
Oval faces are easy to identify, if your face is slightly oval but the sides are not too firm, then your face is an oval type. An oval face is also often referred to as an egg face because the shape of a chicken egg is on average like an oval. How to use shading for an egg face is to apply it along the hairline area, the outermost line of the cheekbones and then give a little line also under the cheekbones, connect your shading from the bone outer cheek to the outermost area of your jaw. Also connect the shading from the jaw to under the cheeks.
- square face
The next way to use shading is for a square/rectangle/square face. Indonesians are among those who have this type of face. It seems that there is no need to explain the characteristics of a square face, because it is clear that the characteristic is a square face. Because the jaw is straight with the cheekbones near the ears, people with square faces need thick and long shading. Continue shading on your jaw (V shape). For the highlight, apply on the chin and under the eyes + nose in a V shape too.